I do have some sensitive data (financial) that I’d like to keep encrypted when at rest. To do that, I use a VHD (virtual hard disk) for my sensitive data and encrypt that VHD with Microsoft’s BitLocker. I recently purchased a new laptop to use for Quicken and TurboTax. This new laptop is running Windows Home, whereas my very old finance desktop PC was running Windows Pro. What I discovered during this process of migrating to the new laptop is that while Windows Home has the capability to read a BitLocker encrypted drive, it does NOT have the capability to encrypt a drive with BitLocker, Microsoft wants you to pay to upgrade to Pro to get that.
My plan to use a BitLocker-encrypted VHD seemed frustrated, until I realized that I can create a small empty BitLocker-encrypted VHD on a separate Windows Pro PC, and just transfer the VHD file to my Windows Home PC, and it all works. I’ll lay out the steps here.
These steps should be performed on a Windows Pro PC, as a Windows Home PC doesn’t have the capability to encrypt a VHD with BitLocker.
If you don’t have one, perhaps you have a friend that does, assuming you trust them enough not to use the recovery key to access your encrypted VHD.
1: Create the unencrypted sparse VHDX
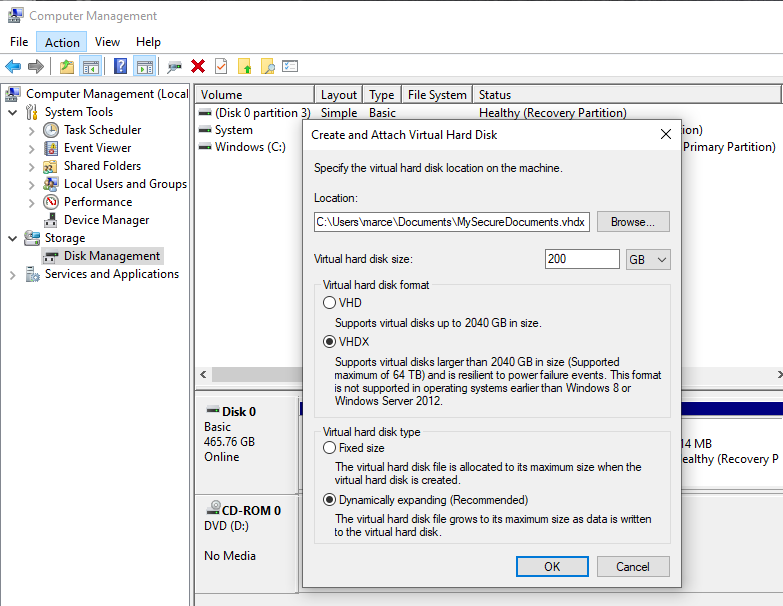
In the Windows search bar, type in “Computer Management” and open it (or if you are not already logged in to Windows as an administrator, “Run as administrator”. This will bring up the Microsoft Management Console GUI. Click on “Disk Management” to get into the list of disks. Now from the “Action” menu select “Create VHD”, and a dialog box should appear.
For the Location, there is where you want the VHD file to initially live. Pick anywhere on your real hard disk, such as your “My Documents” folder, and name it anything, such as “MySecureDocuments.vhdx”.
For the Virtual hard disk size, pick an upper bound that is bigger than what you think you’ll need. Don’t be afraid to pick a big number that is larger that your thumb drive, because initially it won’t be that big. I’ll pick 200GB.
For the Virtual hard disk format, pick “VHDX”. This is the newer format, which is more resilient. I’m assuming you are using a recent version of Windows, such as 10 or 11.
For Virtual hard disk type, select “Dynamically expanding”. This means that your VHDX file won’t initially be the full size that you picked above, but will instead grow as you fill it with data. So again, I encourage you to pick a big number for the size.
Now click OK to create the VHDX.
Now when you look at the list of disks, you’ll see a new one (the VHDX) that is not initialized.
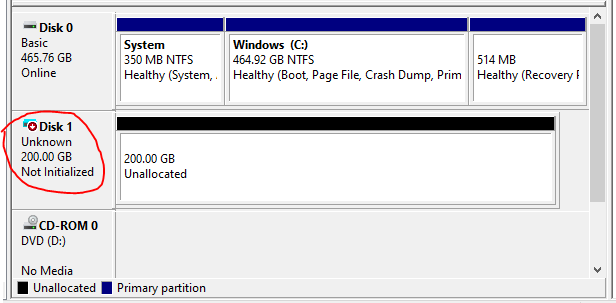
In this list, my VHDX is listed as “Disk 1”. Don’t confuse this with “Disk 0”, which is my real hard drive that holds the C drive and my operating system. So anytime you are clicking on a disk in this list, make sure it is “Disk 1” (or your equivalent, if you have additional hard drives). One way to match it up is to look at the disk sizes – in my list, it is just a hair under the 200GB I selected, whereas my real hard drive is 465GB. Throughout the rest of these instructions, I will refer to “Disk 1” as my VHDX.
2: Initialize the VHDX
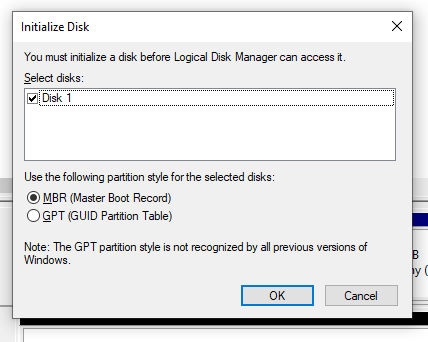
Next, we need to initialize the VHDX. On “Disk 1” where it says “Not Initialized” on the smaller left part (not the larger right part that says “Unallocated”, right-click on it and select “Initialize Disk” from that popup menu. It will bring up a new dialog.

In that dialog, the disk should already be selected with a check.
For the partition style, it doesn’t really matter if you choose MBR or GPT. I prefer GPT because it is the newer format and more robust and handles capacities greater than 2 TB. (The screenshot below was taken before I clicked “GPT”.)
Then click OK to initialize the VHDX.
It should take only a few seconds to run if your VHDX is currently on your hard disk. If it is on a thumb drive, this will take significantly longer, several minutes. Now when you look at “Disk 1” in the list, it should say “Online” and “Unallocated”.

3: Partition and Format the VHDX
Now that we have a virtual disk that is online, we can create a partition on it. All we need is a single partition that fills the whole virtual disk.
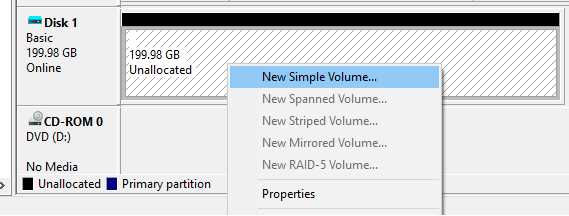
On “Disk 1” where it says “Unallocated” on the disk in the list, right click on it and select “New Simple Volume”. This will launch a multi-step wizard. Click Next to start the wizard.
For the Volume Size, pick the maximum disk space as listed, which it should default to. Click Next.
For “Assign a Drive Letter or Path”, select “Do not assign a drive letter or path”. This is because we’ll be moving it to our Windows Home PC. Click Next.
For “Format Partition” select “Format this volume with the following settings”:
- File system: NTFS
- Allocation unit size: Default
- Volume label: (whatever you want here, such as “My Secure Documents”)
- Perform a quick format: checked
- Enable file and folder compression: (whatever you want here, I chose unchecked).
Click Next.
On this last step in the wizard, it will show a summary of what it will do. Click Finish to start the operation. It should take just a few seconds.
Now when you look at “Disk 1” in the list, it should show the volume name you used, and say “Healthy (Basic Data Partition)”.

4: Temporarily Attach the VHDX
Before we can encrypt the VHDX, we need to be able to access it with a drive letter. So we’ll add one.
Where it says “Healthy” on “Disk 1” in the list, right click and select “Change Drive Letter and Paths”. This will bring up a dialog.
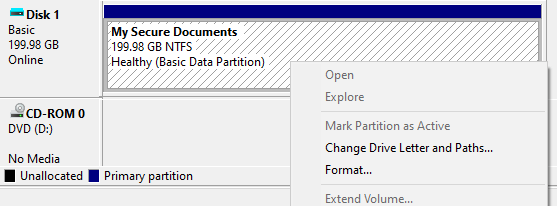
In that dialog, there will be a list of “drive letter and paths” which will be empty. Click the Add button. Now you can pick a drive letter from the drop down list, any letter should be fine, such as “V”. Then click OK.
Now “Disk 1” in the list should show the drive letter next you selected to the volume name.

5: Encrypt the VHDX with BitLocker
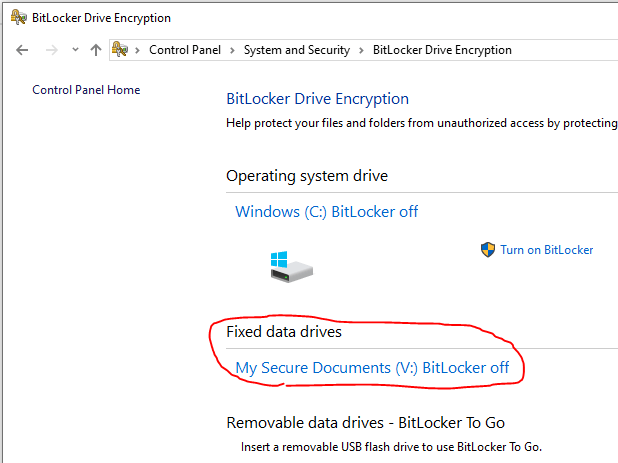
There are 2 equivalent ways to get to the BitLocker controls. The first is by going to the Windows search bar and entering “Control Panel” and opening it, then by selecting “System and Security”, then by selecting “BitLocker Drive Encryption”. The second is by launching File Explorer and going to the “This PC” view and right clicking on the V drive and selecting “Turn on BitLocker”. Here we’ll use the first, so navigate to that spot.
If the only link available in the BitLocker control panels there says “Back up your recovery key”, or there is no BitLocker control panel, then that is a hint that you are running Windows Home instead of Windows Pro, and you won’t be able to perform the BitLocker encryption below.
In the BitLocker control panel, there should be 3 sections: “Operating system drive”, “Fixed data drives”, and “Removable data drives”. We should see the V drive in the “Fixed data drives” section, and it should say “BitLocker off”.
If you click on the V drive listed there, it should expand to show a drive icon and the “Turn on BitLocker” link for the V drive.
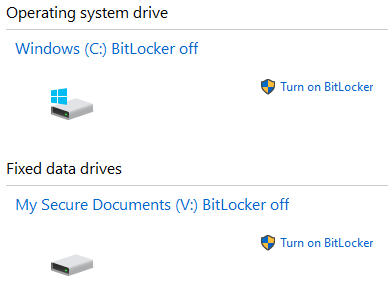
Click on the “Turn on BitLocker” link for the V drive. Don’t confuse this with the similar link for the Operating system drive (C:). This will bring up a wizard.
For “Chose how you want to unlock this drive”, pick the option you want. I’m not using a smart card, so I selected “Use a password to unlock the drive”. If you use this option, you’ll need to enter your new password twice. Be aware that although it doesn’t say so yet, the password must be at least 8 characters long. Then click Next.
Now it will ask how you want to back up your recovery key. Windows will automatically create a recovery key when it encrypts this drive. If you forget your password, you can use the recovery key (a long string) to unlock this drive. Also be aware that anyone else who can get this recovery key can also unlock this drive, so be careful where you put the recovery key. Windows isn’t going to let you skip this step. After you have backed up your recovery key, you’ll be able to click “Next”. Click it.
For “Choose how much of your drive to encrypt, select “Encrypt entire drive”. Click Next.
For “Choose which encryption mode to use”, I selected “New encryption mode”. Again, I’m assuming you are running a recent Windows version, 10 or 11.
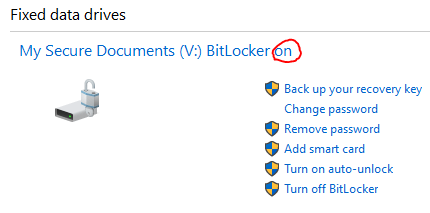
When you get to “Are you ready to encrypt this drive”, select “Start encrypting”. I got a notification popup from Windows saying that it was encrypting this drive. It did give me a notification popup when it was done. But if you return to the BitLocker control panel, it will say for drive V “BitLocker Encrypting” while the initial encryption process is running, and then “BitLocker on” when the initial encryption process is complete. It took about 15 seconds for me.
You now have an encrypted VHDX.
6: Detach VHDX from Windows Pro PC
Now we’ll want to prepare to move our VHDX to the destination Windows Home PC. We’ll first need to cleanly detach it from this Windows Pro PC.
Return to the list of disks. In the left part of “Disk 1” where it says “Online”, right click and select “Detach VHD”.
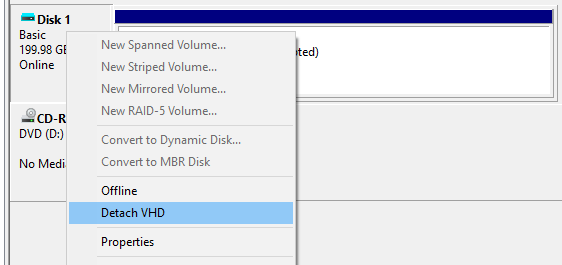
When you select it, it will give you a prompt to first remind you where the VHDX file is located, it should be where you created it. Click OK to perform the detach. “Disk 1” should now disappear from the list.
7: Transfer the VHDX file to your Windows Home PC
On your Windows Pro PC, in File Explorer navigate to where you saved the VHDX file (ie, “My Documents\MySecureDocuments.vhdx”). In my case the VHDX file is less than 700MB, far less than the potential maximum size I entered of 200GB.
Using your preferred mechanism (ie, thumb drive, etc), move the VHDX file to your destination Windows Home PC. It can sit on the hard disk, or it could remain on the thumb drive if you leave it plugged in. Because it is encrypted (and likely empty), it is safe during transit.
However, if you wrote the recovery key to a local device, the same is not true. Be careful how and where you transfer your recovery key, it is a basically a back door that can bypass your BitLocker password.
8: Attach the VHDX as drive letter on your Windows Home PC
The rest of the steps will be performed on the destination Windows Home PC.
So although a Windows Home PC can’t perform initial BitLocker encryption on a disk/VHD/VHDX, it can deal with one that is already encrypted.
Similar to how you did earlier but on this PC, in the Windows search bar enter “Computer Management” and open it. If you are not already logged in as an administrator, select “Run as administrator”. Double click on “Disk Management”.
From the Action menu, select “Attach VHD”. Specify the VHDX file that you just transferred to this PC, and click the OK button. You should see a new disk appear in the list, that is of the same size as you were working on earlier, it will have a new drive letter (“F:”, in my case) and will also say “BitLocker” encrypted.
[insert picture]
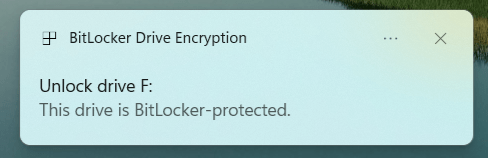
You will also likely see a notification popup that says “Unlock drive F:” that disappears in a couple seconds. It’s OK if you aren’t quick enough to click on it before it disappears.
9: Unlock the VHDX
This is the one step you’ll need to perform each time you reboot your PC to be able to access the VHDX.
Launch File Explorer and in the left pane where it shows “This PC” which can be expanded to show the list of drives. In my case, there is a drive “Local Disk (F:)”. Click it. You should now get in the top right corner of the screen a prompt for the BitLocker password. Enter the password and click Unlock (or hit the Enter key).

If you do not see “Local Disk (F:)” in the File Explorer list, navigate to where you put the VHDX file and double-click on it.
Now when you look back at File Explorer, for the VHDX it should now show your volume name (ie, “My Secure Documents (F:)”).
You now have a disk that you can securely store content in.
Don’t forget to either shutdown your PC or lock that VHDX such that it is not left unattended while unlocked. A suspend (ie, closing the laptop lid) does not lock the VHDX. An easy way to do that if you choose not to do a shutdown, is to go to File Explorer and navigate to “My Secure Documents (F:)” and right-click on it and select “Eject” and watch it disappear from File Explorer.
I hope this helps save you some of the time it took me to figure out this workaround in Windows Home.